


Today we are going to make an app that can capture the screenshot of a website from an input field and display it in a mockup of a web browser. The user could choose the backdrop colour. The screenshot also contains a shadow, which adds to its appeal. It will be simple to download by clicking the download button. It will save a significant amount of time. In the absence of this, a user must take a screenshot, crop it, enlarge it, download a mockup, attach the screenshot to the mockup, apply shadows, and change the backdrop colour.
Isn't that a complete disaster? It accomplishes all of the aforementioned tasks in a matter of seconds, saving you a significant amount of time. We are only using a screenshot API developed by premieroctet. This is how the API call will look like 👇
https://2s9e3bif52.execute-api.eu-central-1.amazonaws.com/production/screenshot?url={website_url}&color={color}
Ok then, now let's start with index.html It has 3 parts.
- For the 1st part, we will make the homepage which will look something like what you see below.

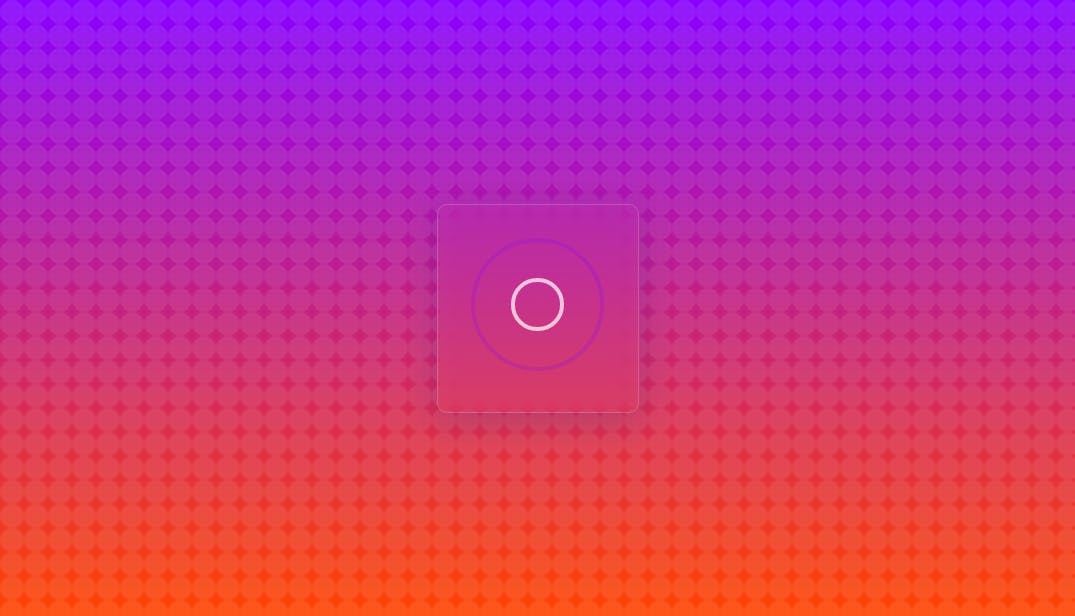
- For the 2nd part, we will make a loader in order to wait for the API to do its work.
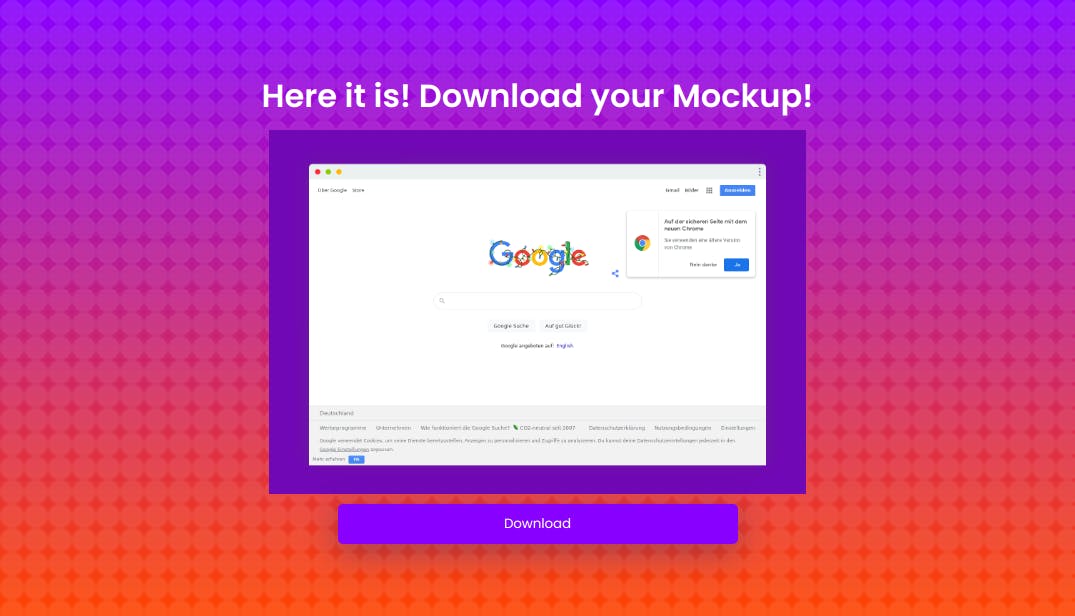
- The 3rd part will be the last page, where the final screenshot is displayed along with a button to download it.
So now let's get into the html.
<!DOCTYPE html>
<html lang="en">

<head>
    <meta charset="UTF-8">
    <meta name="viewport" content="width=device-width, initial-scale=1.0">
    <title>Web Mockup by Abhiraj</title>
    <link rel="stylesheet" href="style.css">
</head>

<body>
    <section id="section1">
        <h1>Take screenshots from website urls in seconds.</h1>
        <div class="cont">
            <input type="text" id="websiteAdress" value='google.com'>
            <div class="color_cont">
                <div id="color_demo"></div>
                <input type="text" id="bgColor" value='7108B6'>
            </div>
            <button type="submit" id="submitBtn" onclick='generateMockup();changeView()'>Take Screenshot</button>
        </div>
    </section>
    <div id="section2">
        <div class="wrapper">
            <div class="loadingio-spinner-ripple-4o61jz917vh">
                <div class="ldio-tnoicgfz6f">
                    <div></div>
                    <div></div>
                </div>
            </div>
        </div>
    </div>
    <div id="section3">
        <div class="cont">
            <h1>Here it is! Download your Mockup!</h1>
            <img alt="" id='resultImg'>
            <button id="Download">Download</button>
            </a>
        </div>
    </div>

    <script src="index.js"></script>
</body>

</html>
Now that we have the basic structure of our app, let's add some styles to it.
@import url("https://fonts.googleapis.com/css2?family=Poppins:wght@400;500;600&display=swap");
* {
  margin: 0;
  font-family: "Poppins", sans-serif;
  padding: 0;
}
body {
  min-height: 100vh;
  width: 100%;
  background-color: #ffffff;
  background-image: url("data:image/svg+xml,%3Csvg xmlns='http://www.w3.org/2000/svg' width='100%25' height='100%25' %3E%3Cdefs%3E%3ClinearGradient id='a' x1='0' x2='0' y1='0' y2='1'%3E%3Cstop offset='0' stop-color='%2380F'/%3E%3Cstop offset='1' stop-color='%23f40'/%3E%3C/linearGradient%3E%3C/defs%3E%3Cpattern id='b' width='24' height='24' patternUnits='userSpaceOnUse'%3E%3Ccircle fill='%23ffffff' cx='12' cy='12' r='12'/%3E%3C/pattern%3E%3Crect width='100%25' height='100%25' fill='url(%23a)'/%3E%3Crect width='100%25' height='100%25' fill='url(%23b)' fill-opacity='0.1'/%3E%3C/svg%3E");
  background-attachment: fixed;
  background-size: cover;
  color: #fff;
  display: flex;
  align-items: center;
  justify-content: center;
}
input {
  padding: 0 10px;
  outline: none;
}
#section1 {
  background: rgba(255, 255, 255, 0);
  box-shadow: 0 8px 32px 0 rgba(31, 38, 135, 0.2);
  backdrop-filter: blur(12.5px);
  -webkit-backdrop-filter: blur(12.5px);
  border-radius: 10px;
  border: 1px solid rgba(255, 255, 255, 0.18);

  width: 60%;
  height: 28em;
  text-align: center;
  /* display: none; */
  align-items: center;
  flex-direction: column;
  justify-content: center;
}

#section1 h1 {
  font-size: 2em;
  padding: 30px;
}

#websiteAdress {
  height: 40px;
  width: 400px;
  border-radius: 5px;
  border: none;
  margin: 0 0 15px 0;
}
.color_cont {
  height: 40px;
  width: 420px;
  background: #fff;
  border-radius: 5px;
  border: none;
  display: flex;
  align-items: center;
  justify-content: flex-start;
  margin: 0 0 15px 0;
}
#color_demo {
  width: 30px;
  height: 30px;
  border: 1px solid #ccc;
  border-radius: 5px;
  background: #7108b6;
  height: 30px;
  margin: 0 5px;
}
.color_cont input {
  height: 30px;
  width: 350px;
  border-radius: 5px;
  border: 1px solid #ccc;
}
button {
  height: 40px;
  width: 400px;
  border-radius: 5px;
  background: #8800ff;
  color: #fff;
  background-blend-mode: screen, color-dodge, overlay, difference, normal;
  border: none;
  box-shadow: 0 8px 32px 0 rgba(31, 38, 135, 0.37);
  cursor: pointer;
}

/* Section 2 */
#section2 {
  display: none;
}

.wrapper {
  background: rgba(255, 255, 255, 0);
  box-shadow: 0 8px 32px 0 rgba(31, 38, 135, 0.2);
  backdrop-filter: blur(12.5px);
  -webkit-backdrop-filter: blur(12.5px);
  border-radius: 10px;
  border: 1px solid rgba(255, 255, 255, 0.18);
}
@keyframes ldio-tnoicgfz6f {
  0% {
    top: 96px;
    left: 96px;
    width: 0;
    height: 0;
    opacity: 1;
  }
  100% {
    top: 18px;
    left: 18px;
    width: 156px;
    height: 156px;
    opacity: 0;
  }
}

.ldio-tnoicgfz6f div {
  position: absolute;
  border-width: 4px;
  border-style: solid;
  opacity: 1;
  border-radius: 50%;
  animation: ldio-tnoicgfz6f 1s cubic-bezier(0, 0.2, 0.8, 1) infinite;
}

.ldio-tnoicgfz6f div:nth-child(1) {
  border-color: #ffffff;
}

.ldio-tnoicgfz6f div:nth-child(2) {
  border-color: #8800ff;
  animation-delay: -0.5s;
}

.loadingio-spinner-ripple-4o61jz917vh {
  width: 200px;
  height: 200px;
  display: inline-block;
  overflow: hidden;
}
.ldio-tnoicgfz6f {
  width: 100%;
  height: 100%;
  position: relative;
  transform: translateZ(0) scale(1);
  backface-visibility: hidden;
  transform-origin: 0 0; /* see note above */
}
.ldio-tnoicgfz6f div {
  box-sizing: content-box;
}

/* Section 3 */
#section3 {
  display: none;
  align-items: center;
  justify-content: center;
  text-align: center;
  flex-direction: column;
}
#resultImg {
  width: 50%;
  margin: 10px;
}
.cont {
  display: flex;
  align-items: center;
  justify-content: center;
  flex-direction: column;
}
Now that our app is almost complete, all we need now is Javascript to make the app functional.
First, we can go initialise some of our components. We could initialise others in the respective functions
const section1 = document.getElementById("section1");
const section2 = document.getElementById("section2");
const section3 = document.getElementById("section3");
const resultImg = document.getElementById("resultImg");
const Download = document.getElementById("Download");

const submitBtn = document.getElementById("submitBtn");
Now lets get into it.
const changeColor = () => {
  const bgColor = document.getElementById("bgColor").value;
  const color_demo = document.getElementById("color_demo");

  color_demo.style.background = "#" + bgColor;
};

bgColor.addEventListener("input", changeColor);
bgColor.addEventListener("propertychange", changeColor);

const generateMockup = () => {
  const websiteAdress = document.getElementById("websiteAdress").value;
  const bgColor = document.getElementById("bgColor").value;
  const mockup =
    "https://2s9e3bif52.execute-api.eu-central-1.amazonaws.com/production/screenshot?url=" +
    websiteAdress +
    "&color=" +
    bgColor;
  console.log(mockup);
  resultImg.src = mockup;

  section1.style.display = "none";
  section2.style.display = "block";

  Download.addEventListener("click", function () {
    window.open(mockup);
  });
};
const changeView = () => {
  setTimeout(() => {
    section2.style.display = "none";
    section3.style.display = "block";
  }, 6500);
};
Oh yeah, that's it we have finished our project 📸
Check out the source code on Github
Thanks for reading. Until next time. Abhiraj